In old remote installation services, you have the options to customize computer name or select automatic installation while running RIS on a client. similarly, new Windows deployment services has the option for you to set naming policy in Windows Deployment Services server. In WDS server, by default naming policy set to %Username%# that means WDS will create computer name using username who logged on when running remote installation process and # is the number 1,2,3..up to 999 will be added after username. To Set naming policy and default organisational unit in Active Directory. Log on to WDS server using domain admin credentials.
Start menu>Administrative Tools>Windows Deployment Services>Expand Servers>Right click on WDS server>Property>Directory Services Tab
Set Automated name add the string you want and browse and point the OU in Active Directory you want to place computers.

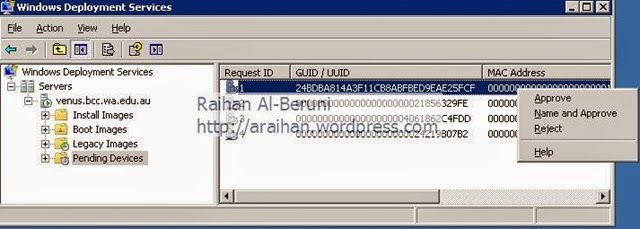
Now boot an unknown client i.e. new client in the network. Client will automatically boot using WDS. Log on to WDS server and go to pending devices as shown here. Select and right click the computer that’s waiting for approval, click name and approve. Type Name and Approve this pending device. If you want to place this computer in a specific OU in Active Directory then click location and place in that OU.


Pre-staging an approval of a client:
- To open Active Directory Users and Computers
- In the console tree, right-click the organizational unit that will contain the new client computer.
- Click New, and then click Computer.
- Type the client computer name, click Next, and then click This is a managed computer.
- In the text entry field, type the client computer’s globally unique identifier (GUID/UUID) and then click Next.
- Click one of the following options to specify which server or servers will support this client computer. Check The following remote installation server and Type WDS server’s FQDN
- Click Next, and then click Finish.
Important! The term GUID usually refers to Microsoft‘s implementation of theUniversally Unique Identifier (UUID) standard. A UUID is a 16-byte (128-bit) number. The number of theoretically possible UUIDs is therefore about 3 × 1038. In its canonical form, a UUID consists of 32 hexadecimal digits, displayed in 5 groups separated by hyphens, in the form
8-4-4-4-12 for a total of 36 characters (32 digits and 4 hyphens). For example:
24bdba81-4a3f-11cb-8abf-bed9eae25fcf
Screen Shots for further help:


Note: Typed without ‘-‘ (hyphen)


Now this re-image this computer by pressing F12 while booting.
To find UUID:
1. Log on to Windows XP Machine. Open Command Prompt>Change directory to C:\Windows\system32\wbem Type wbemtest.exe hit enter.
2. Click Connect. Change root\default to root\cimv2 >hit connect.
3. Click Enum Classes button>choose Recursive>Click ok.
4. A Query Result will appear, scroll down, select Win32_ComputerSystemProduct then Double click it then Object editor for win32 will appear
5. In the Properties box scroll down, choose UUID and click Instances button. In the Query Result, Select Win32_ComputerSystemsProduct double click on it and another Object Editor will appear and it contains desired UUID for the computer.
It’s painful process but you may find UUID in some computer and laptop’s bios. For example, on IBM R61 laptop I got UUID in bois.


0 comments:
Post a Comment